How to Integrate Speed Kit: A Step-by-Step Guide
Key Takeaways
- Effortless Setup: Get started in minutes with our one-click plugins for popular shop systems or by copying a single line of code from your personalized guide.
- We Do the Hard Work: After the initial setup, our dedicated Product Integration team handles all the configuration for you.
- Simple & Risk-Free: You can easily verify the setup with our browser extension and just as easily uninstall Speed Kit if you choose not to proceed after testing.
Introduction
Integrating Speed Kit is designed to be exceptionally fast and simple and require minimal effort from your team. We provide a guided process where our experts handle all the heavy lifting. This guide walks you through the straightforward process to get your website accelerated.
The Standard Integration Process
If your website does not run on one of the platforms listed above, we have streamlined our onboarding into four simple steps.
Step 1: The Kickoff Meeting
The process begins with a collaborative kickoff meeting where we align on your project timeline and define a rollout plan. To clarify the technical details required to build your custom configuration, we highly recommend that a key technical stakeholder from your team (e.g., a lead developer or solution architect) joins this meeting. This ensures we can efficiently address the following questions:
- Which page types should be accelerated?
- What data on your pages is dynamic, such as prices or stock levels?
- Are you using any third-party tools, like waiting rooms or A/B testing solutions, that Speed Kit needs to integrate with?
- How can we automatically detect when a new deployment occurs on your site?
- What is the typical frequency, timing, and scope of your deployments?
- Do you have a staging or testing environment available that we can use for the initial setup and QA?
- Are there any rate limits on your backend systems that we should configure Speed Kit to respect?
- Do you perform regular bulk updates, such as for your product catalog, and what is their schedule?
- What is your desired rollout strategy?
Step 2: Your Technical Setup
For Shopify Stores
For Shopify, the technical setup is automated. Simply install the official Speed Kit app from the Shopify App Store. The app will handle the necessary technical steps for you.
To allow us to crawl your pages, you also need to generate a crawling token. Please follow the instructions on the Shopify help page to generate the token. After generating the key in your Shopify Admin Panel, follow these steps:
- Navigate to your Speed Kit Dashboard and select Configs from the sidebar.
- Under Configure Crawler Access Signature, you will find three fields: Signature, Signature-Input, and Signature-Agent.
- Copy the data from the key you generated and paste it into the corresponding fields.
- Click Save.

For All Other Platforms
For any other platform, your setup involves three simple actions, which most customers complete in two hours. Speed Kit provides a personalized integration guide with clear copy-and-paste instructions for each step (example: Installation Guide).
- Integrate the Script Tag: Add a single script tag to your site's HTML to install the Speed Kit Service Worker.
- Host the Service Worker File: Place the provided Service Worker file in the root path of your domain.
- Whitelist Our IP Addresses: To ensure flawless communication, update your firewall settings to allow requests from our backend system's fixed IP address range.
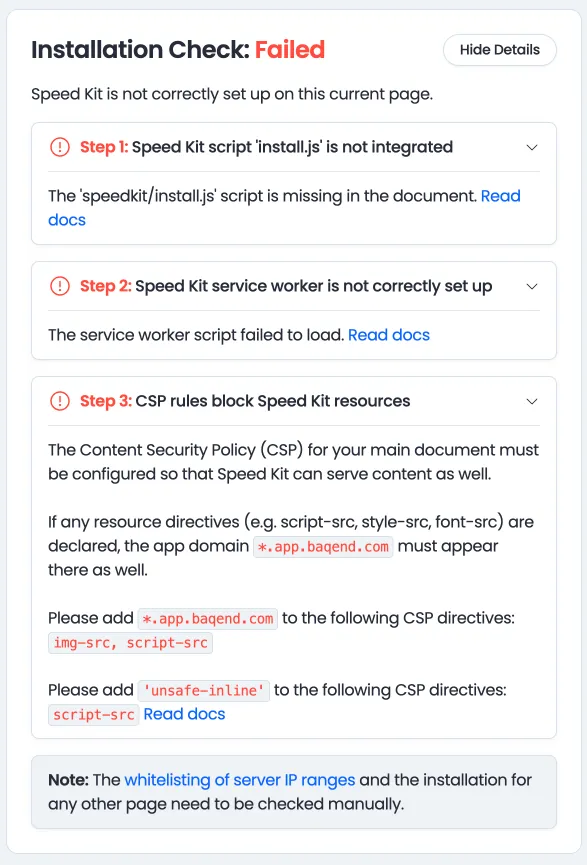
You can instantly verify that your setup is correct using the Installation Check in the Status dashboard of our Speed Kit Chrome Extension.
When all steps are completed correctly, the extension will show blue checkmarks next to each requirement.

If any part of the setup is incorrect, the extension will immediately flag the specific issue. It also provides clear, step-by-step instructions on how to resolve the exact problem, allowing you to fix it quickly and easily without guesswork.
Alternative Method: Using a Tag Manager (Not Recommended)
While technically possible, integrating Speed Kit via a tag manager (e.g., Google Tag Manager) is strongly discouraged. Industry reports show that up to 45% of internet users have ad blockers that block tag managers by default.
This leads to several critical issues:
- Loss of Coverage: A large portion of your audience will not be accelerated, as Speed Kit will fail to load for them.
- Incomplete RUM Data: Our performance monitoring (RUM) will also be blocked, creating a massive blind spot in your analytics.
Technical Conflicts: This method is incompatible if your website already uses its own service worker.
Step 3: We Build Your Configuration
Our work begins immediately after the kickoff meeting, running in parallel while you complete your technical setup. The Speed Kit Product Integration team builds the perfect configuration tailored to your site's architecture based on the information from our call. There are no complex forms to fill out or technical settings for you to manage. To ensure the setup is flawless, our team may have a few technical questions, so we just need a designated contact person on your side to support us.
While we work in parallel, please note that your technical setup must be complete before we can move on to the QA phase.
Step 4: Quality Assurance (QA)
Once your technical setup is complete and our Product Integration team has built the configuration, we move to the quality assurance phase. While our internal QA team conducts a thorough validation of the setup, we encourage your team to perform its own testing. You can easily activate Speed Kit on the live site—visible only to your local browser—without any risk to your users. This can be done using our Chrome browser extension, a special bookmarklet, or a URL parameter, allowing you to test under real-world conditions. For detailed instructions, please refer to our QA documentation.
Step 5: Go-Live and Fine-Tuning
Following a successful QA phase, we will schedule a Go-Live meeting to confirm readiness and initiate the rollout. After the call, we will activate Speed Kit for 10% of your users. This initial phase allows us to collect valuable Real User Monitoring (RUM) data to fine-tune the configuration and further optimize performance. Once this is complete, we expand the rollout to a 50/50 A/B test to compare Speed Kit's performance against your original site with statistical accuracy.
Step 6: Business Impact Review
Once the A/B test has collected statistically significant data, we schedule a final review meeting. In this session, our Customer Success Manager will present a detailed business impact analysis. This report visualizes how the measured performance uplift translates into key business metrics and potential ROI. This transparent, data-driven overview empowers you to make a final, informed decision about using Speed Kit.
Self-Service Integrations: WordPress & Plesk
For WordPress and Plesk, we offer self-service plugins that allow you to get started on your own. Simply install the appropriate extension and follow the on-screen instructions.
- WordPress: Install the Speed Kit plugin from the WordPress Plugin Directory.
- Plesk: Install the Speed Kit extension from the Plesk Extensions Catalog. After installation, the plugin will guide you through the setup. Our team will then take over to finalize the configuration.
Support & Reversibility
That’s all you have to do. Our Product Integration team is happy to support you at every stage. And if you decide Speed Kit isn't for you after testing, uninstalling is as simple as removing the JavaScript snippet or deactivating the plugin.
For those who want to dive deeper into our technology, we invite you to read our detailed documentation:
- Dynamic Caching: Learn how Speed Kit's multi-layer architecture caches dynamic content while ensuring it remains perfectly synchronized with your origin server.
- Uninterrupted Performance: Discover the architecture, fail-safes, and support systems that guarantee reliability.